How to soft reset Linux disks

Sometimes disks stop responding and cause system slowness because the kernel is waiting for a response that never comes. The disk appears 100% utilised in iostat even though nothing is being read or written.

To avoid rebooting, reset the device. First find it:

lsscsi

Then remove and rescan:

echo 1 > /sys/block/sdX/device/delete
echo "- - -" > /sys/class/scsi_host/hostX/scan

Replace sdX with the affected device and hostX with the SCSI host number from lsscsi.

Hope it helps!

Find sdx device/ATAx mappings

When dealing with hardware, you often see log messages like:

ata9: hard resetting link
ata9: SATA link up 1.5 Gbps (SStatus 113 SControl 310)

To map an ata number to the actual sdX device:

ls -l /sys/class/ata_device/ata9/device/host*/target*/*/block

This shows which sdX corresponds to ata9. Check dmesg for the initial discovery mapping too.

Enjoy!

How to shred/wipe disks/partitions

When you delete a file normally, the data stays on the disk — the filesystem just marks the space as available. The data can be recovered with the right tools. If you need to make sure it is really gone, you can overwrite it securely.

shred -vzf -n 5 /dev/sdb

The -v flag shows progress, -z adds a final overwrite with zeros to hide the fact that shredding took place, -n specifies the number of passes (5 in this example), and the device is the disk or partition you want to wipe.

Be careful with this command — there is no undo. Double-check the device name before running it.

Shredding a single file

If you only need to destroy a specific file rather than an entire disk, use shred on a file directly:

shred -vzu sensitive-file.pdf

The -u flag tells shred to delete the file after overwriting it. Without -u the file remains in place but with its content overwritten.

Wiping with dd for more control

If you want to see exactly what is being written and you know the disk size, dd gives you more control:

sudo dd if=/dev/urandom of=/dev/sdb bs=4096 status=progress

This writes random data in 4K blocks and shows a progress indicator. Replace urandom with zero (if=/dev/zero) for a faster but less thorough wipe. The trade-off is that a single zero pass is detectable — someone with specialised equipment can still read the residual magnetic signature.

Verifying the wipe

After wiping a disk, you can verify that no readable data remains:

sudo xxd /dev/sdb | head

If the output shows consistent patterns (all zeros or all random bytes), the wipe was successful. If you see fragments of old filesystem structures, you might need another pass.

Note on SSDs

Shred relies on overwriting the same physical sectors multiple times. On modern SSDs, wear-levelling and TRIM make this unreliable — the drive may remap sectors and leave old data in place. For SSDs, use the ATA Secure Erase command built into the drive firmware instead. Most Linux distributions include the hdparm or nvme-cli tools for this:

sudo hdparm --user-master u --security-set-pass p /dev/sdb
sudo hdparm --user-master u --security-erase p /dev/sdb

Or for NVMe drives:

sudo nvme format /dev/nvme0n1 -s1

The best defence against needing to wipe a disk securely is full-disk encryption. If the drive was encrypted from day one, a single pass of zeros is enough to make the data unrecoverable — the encryption keys are gone, and the rest is ciphertext.

Enjoy!
Formatting a partition from command line

When you need to format a partition from the command line, a few commands are all you need. Here’s the typical workflow.

First, create the filesystem:

mkfs.ext4 /dev/sdxy

If you want to reserve less space for the root user:

tune2fs -m 0 /dev/sdxy

Check the filesystem for errors before mounting:

fsck.ext4 -fy /dev/sdxy

Then mount it where you need it:

mount /dev/sdxy /wherever/I/want

Replace /dev/sdxy with your actual partition and /wherever/I/want with your mount point.

Enjoy!

Logical Volume Management basics

I have explained how to activate an LVM logical volume before, but never talked much about LVM itself. Here is a brief introduction.

I have been playing with LVM for about a couple of years now and I must say I have found it very practical, even for managing simple home desktops and servers. The main feature I use is the ability to resize volumes online, but LVM is useful for other things too: creating snapshots, combining multiple disks into a single volume group, and adding redundancy through mirroring.

Physical Volumes, Volume Groups, Logical Volumes

LVM works in three layers:

  • Physical Volume (PV) — a disk or partition that LVM can use. Initialised with pvcreate.
  • Volume Group (VG) — a pool of storage made from one or more physical volumes.
  • Logical Volume (LV) — a virtual partition carved out of a volume group. This is what you format and mount.

Start by preparing a partition (use fdisk to set the type to 8e — Linux LVM):

sudo pvcreate /dev/sdb1
sudo vgcreate my_volume_group /dev/sdb1
sudo lvcreate -L 10G -n my_volume my_volume_group

Now format and mount it:

sudo mkfs.ext4 /dev/my_volume_group/my_volume
sudo mount /dev/my_volume_group/my_volume /mnt

Resizing

Need more space? If you have free space in the volume group:

sudo lvextend -L +5G /dev/my_volume_group/my_volume
sudo resize2fs /dev/my_volume_group/my_volume

The filesystem is resized online — no unmounting required.

Snapshots

LVM snapshots let you take a point-in-time copy of a volume. Useful for backups:

sudo lvcreate -L 1G -s -n my_snapshot /dev/my_volume_group/my_volume

The snapshot starts small and grows as changes are made to the original volume. Remove it when no longer needed:

sudo lvremove /dev/my_volume_group/my_snapshot

Enjoy!

How to fix GRUB 2 with Ubuntu live cd

When GRUB fails and your system won’t boot, the errors can be intimidating. But fixing it with a live CD is straightforward.

Boot from an Ubuntu live CD or USB. Once the desktop loads, open a terminal.

First, mount your root partition:

sudo mkdir /mnt/newroot
sudo mount /dev/sdxy /mnt/newroot

Bind the virtual filesystems:

sudo mount --bind /dev /mnt/newroot/dev
sudo mount --bind /proc /mnt/newroot/proc
sudo mount --bind /sys /mnt/newroot/sys

Chroot into your system:

sudo chroot /mnt/newroot

Reinstall GRUB:

sudo grub-install /dev/sdx
sudo update-grub

Exit the chroot, unmount everything, and reboot. Remove the live CD when prompted.

For UEFI systems, the command changes slightly:

sudo grub-install --target=x86_64-efi --efi-directory=/boot/efi

If you can still reach a grub rescue prompt, try booting manually:

set root=(hd0,msdos1)
set prefix=(hd0,msdos1)/boot/grub
insmod normal
normal

Enjoy!

Mount Windows share on Linux

Sometimes I still have to deal with Windows. :-/ This time it’s an office shared disk. I was able to mount it automatically but only root could write in it, which meant I couldn’t paste files from Nautilus.

To overcome this I added the following entry in /etc/fstab:

//192.168.0.1/deviceName$ /mountpoint cifs
domain=hq,username=myUsername,password=myPassword,
_netdev,uid=username,gid=username 0 0

The _netdev option ensures the share is mounted only when the network is available, which is particularly useful on laptops that switch networks.

Once you have changed the fstab, unmount the network drive if it was already mounted:

sudo umount /mountpoint

and then mount it again:

sudo mount -a

If you only need occasional access to a Windows share, smbclient is a quick alternative:

smbclient //192.168.0.1/deviceName$ -U myUsername

This opens an FTP-like interface for browsing and transferring files.

Hope it works for you!

Linux: what is partition UUID and how to use it

If you have worked with Linux disks, you have seen device names like /dev/sda1. They work fine until you add or remove a disk — then the names can shift, breaking your mount points and scripts. UUIDs solve this because they are permanent and tied to the filesystem itself.

Instead of writing /dev/sda1 in fstab, use the UUID:

UUID=65b14742-9610-4289-8ea4-af8edcc5d8da /media/data ext4 defaults 0 2

There are a few ways to find the UUID of a partition:

sudo vol_id -u /dev/sda2
sudo blkid
ls -l /dev/disk/by-uuid/

On older systems vol_id was the standard tool, while blkid is the modern equivalent available on virtually all current distributions. You can also see the PARTUUID with blkid, which identifies the partition table entry rather than the filesystem — this is useful for booting with UEFI.

If UUIDs feel unwieldy, you can label a filesystem and use the label instead:

sudo e2label /dev/sda1 mydata
LABEL=mydata /media/data ext4 defaults 0 2

Labels are easier to read but not guaranteed to be unique. UUIDs are the safer choice for production systems.

Hope it works!

Load LVM partition manually

Sometimes you have to load a logical volume that is not part of the main filesystem. Other times you might have to mount a volume from a live CD, perhaps to recover data from a system that is no longer booting.

In both cases it needs to be done manually.

Install the LVM tools

If lvm2 is not already installed:

sudo apt-get install lvm2

Scan for and activate volumes

If you can see the disk with fdisk but LVM does not recognise the volumes, the kernel may not have scanned for them yet. Start by scanning for physical volumes and volume groups:

sudo pvscan
sudo vgscan
sudo lvscan

pvscan detects LVM physical volumes, vgscan finds the volume groups, and lvscan lists the logical volumes within them.

Activate and mount

If the volume group is inactive (common after booting from a live CD or moving a disk to another machine), activate it:

sudo vgchange -ay

This activates all available volume groups. Now mount the logical volume:

sudo mount /dev/VolumeGroupName/LogicalVolumeName /mnt

Replace VolumeGroupName and LogicalVolumeName with the names shown by lvscan. If you are not sure what the volume is called, check /dev/mapper/ for device-mapper entries.

Troubleshooting

If lvscan shows your volumes but vgchange reports “Volume group not found”, check the output of vgscan carefully. Sometimes the volume group name contains a hyphen (e.g. my-server) which can confuse the command — try using the full path from /dev/mapper/ instead:

sudo mount /dev/mapper/my--server-myvol /mnt

Note the double hyphen — LVM represents the hyphen in the volume group name as — in the mapper path.

Enjoy!

How to install “as many Operating Systems as you want” in one machine

Do you often have the need, or want the pleasure, to try a new operating system?
Do you prefer using a “real machine” rather than creating a virtual one (like VMware or Virtualbox for instance)?
Have you got a spare machine for this purpose?
Ok, if you responded “Yes” to all the above, please read on…

Some theory
A hard disk partition can be:
– primary;
– extended;
– logical.

Primary partition
A hard disk can be divided in no more than four primary partitions. Microsoft Windows requires to be installed in a primary partition in order to boot. In some older versions it even requires to be in the first partition as Wikipedia says: “In DOS and earlier versions of Microsoft Windows systems, the system partition was required to be the first partition. Windows operating systems must be located in a primary partition. Other operating systems do not have this peculiar requirement.”

Extended partition
Instead of creating four primary partitions one can be “sacrificed” to be an extended one. A hard disk may contain only one extended partition which can be subdivided into multiple logical partitions.
The only purpose of an extended partition is to contain logical partitions.

Logical partition
These can be used as normal partitions except for the fact that Windows cannot boot from them. Linux can… :-) Nice penguin!

Practice
So, this is the “secret”. You can use logical partitions for installing all Linux flavours that you like so much and can’t live without (SWAP and other OSs) and keep the primary partitions for the lovely Windows.
To start partitioning your hard drive you can use gParted which is the best tool I’ve ever found for this purpose (or any other partitioning tool you like). gParted is included in Ubuntu but I’m quite sure it can be installed in other distros as well.

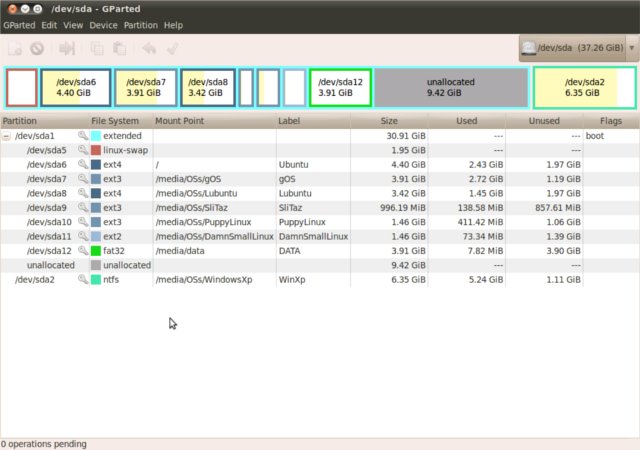
Now you should be ready to have a look at my experiment:
GParted - multi Operating Systems
As you can see I created an extended partition in the first one (“/dev/sda1”) and I kept a primary partition for Windows Xp (“/dev/sda2”).
Inside the extended partition I’ve created six logical partitions for some linux flavours all functioning, plus a SWAP (“/dev/sda5”) partition and a DATA (“/dev/sda12”) partition used to share files among the OSs. I’ve choosen “fat32” since some Linux distributions don’t support NTFS out of the box.

After all of this, my little hard disk still has 9 GB free. What other operating system should I install? :-)
All operating systems are managed by a boot loader (Grub2) which gives me the possibility to choose which OS to start. Grub2 is shipped with many recent distributions like Ubuntu Lucid for example.

In the near future I might write a post on how to recover a lost grub which makes the computer unbootable.
Enjoy the freedom to try all the operating systems you are curious about.